How to Build Your Own Scoreboard Center Start Tiles
After following all of the instructions in the BYOfiles
page:
- Creating your Tile1 directory.
- Copying all of the tile and grid images to the Tile1 directory.
- Creating your first MyBoard.htm file.
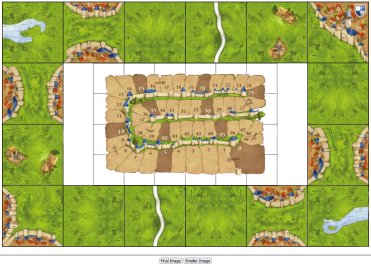
When you double click on the MyBoard.htm file, this is what you
will see.
It is a standard website <table> that contains a 6 tile by 4 tile border that has been modified by the <style> section of the HTML file to eliminate all of the white space between the table's rows and columns so that all of the tiles touch each other.
There is a hole in the center of the <table> that spans 2 rows and 4 columns that contains a 50% sized scoreboard GIF file with transparent edges.
Each border tile has been placed in the table with the following HTML coding:
<td><img class=ct0 src=FFFF.jpg></td>
Each border tile has a class= name of ct0 ct1 ct2 or ct3 where ct stands for Carcassonne Tile and the number says how many times each tile has to be rotated clockwize.
The tiles that you copied from the BYOfile page are currently either 260 x 260 pixels or 207 x 207 pixels. Most of the tiles images on the WikiCarPedia pages are 110 x 110 pixels. The scoreboard img class=ct# coding will either expand or shrink every tile to 207 x 207 pixels. The size of any additional tile images that you add to our Tile1 directory is irrelevant, the tile images only have to square. Higher resolutions give you more detailed printed images, but every tile will print the proper size.
It is now time to right click on the MyBoard.htm file, and open it with
notepad. The first thing you should do is click on File .. Save As,
and save the raw MyBoard coding under the name of the scoreboard that
you want to create.
OK, now that you have created your personal scoreboard.htm file, and it is open in notepad, it is time to also double click your filename in your Tile1 directory to open it up in your web browser.
NOTE: If the size of your monitor will not allow you to see the entire page with the [Final Image] [Smaller Image] buttons under it, just change your browser's zoom factor until you can see everything. We will talk about how you can copy and print your full size scoreboard later!
It is now time to start making some of your personal changes to the scoreboard tiles. Change the name of the source tile in src=FFFF.jpg to the tile name you want in that position and change its class=ct0 to the proper number of rotations that you want.
When you want to see how your changes look, click Ctrl+S on your notebook page, then refresh you web browser page.
Just keep repeating this process until you are happy with the [Final Image] of the scoreboard that you want.
Please excuse me while I talk a little deeper into some Geek
Speak that you might need for your personal scoreboard.
When you normally place multiple image on a page, they will be placed next to each other. In the <style> section at the top of each Scoreboard HTML page the <td class=overlay> has been defined as a table cell that can contain multiple image all on top of each other. The top left corner of each image will be displayed at X Y coordinates 0 0 relative to the top left corner of the table cell.
This is an example of the coding if you want to place an Inn next to a Road on your Scoreboard tile.
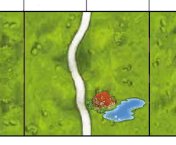 
The Road had to be placed first, then the Inn could be placed on top of the Road Tile with relative top left, X Y, coordinates.
Now let's get Super Geeky.
I just said that the images have to be displayed in the proper order so that images can be placed on top of each other. That is true for a normal 2 dimensional X Y coordinate web page: where everything has its default third dimension Z-index set to zero. If you want to create a webpage on top of a watermark background, all you have to do is display the watermark background image with a Z-index of -1. If you want to create a scoreboard table and then place your scoreboard image on top of all of the border tiles, where some of the border tiles were defined before the scoreboard and some after, all you have to do is to display the scoreboard with a Z-index of +1. That is exactly how the scoreboard image is displayed in the middle of the table when you are working on it and then on top of all the border tiles when you are finished.
Printing your personal Scoreboard
Your final goal is to create a 1242 by 828 pixel high resolution image of your personal scoreboard. If your personal computer monitor cannot handle an image that resolution, NO PROBLEM, you can still work on the design of your personal scoreboard on your computer, just do the work at a lower web browser zoom factor. All of your work is being done in your personal Tile1 directory which you can easily copy to USB flash drive. Then you can take your flash drive to another computer with a higher resolution monitor to make the final digital copy of your scoreboard.
 After creating your personal directory and editing your personal Tile1 HTML page and creating the image of your Start Tile, there is one serious problem that you will face. You cannot just click on the start tile image and copy it to a word document, BECAUSE, the image you are looking at is actually a combination of 17 (or more) separate images. If you click on the scoreboard, you will only be copying the actual scoreboard GIF file image with transparent edges. BUT, at least in FireFox, there is a way around this problem. After creating your personal directory and editing your personal Tile1 HTML page and creating the image of your Start Tile, there is one serious problem that you will face. You cannot just click on the start tile image and copy it to a word document, BECAUSE, the image you are looking at is actually a combination of 17 (or more) separate images. If you click on the scoreboard, you will only be copying the actual scoreboard GIF file image with transparent edges. BUT, at least in FireFox, there is a way around this problem.
After you click "Final Image" at the bottom of your screen so that the scoreboard expands to cover the full 6 by 4 tile image:
Don't just right click on the image itself, which only gives you the option to "Copy Image" . . .
- Right click on the empty white space next to the image
- Then select "Take Screenshot"
- Move the mouse over top of the score board
- A dashed line will appear surrounding your entire new Start Tile
- Click your mouse
- Then click the "Copy" button that will appear on the page
- Now you can paste the full image onto a Word document for printing
- ... OR into your image editing software so you can save it as a JPEG image file.
The "screenshot" will include the tiles that are under the transparent edges of the scoreboard image!
NOTE: The biggest problem you will now have is getting your personal
printer to print an image that is exactly 6 tiles wide. My personal measurements
show that 6 tiles will be about 10 5/8 inches wide which leaves only 3/8 of an inch
for both margins on an 11 inch long standard letter sheet of paper. My personal
combination of Microsoft Word and an HP OfficeJet Pro 6960 printer does allow for
the printed page margins to be as small as 0.12 inch. Your printer might not allow
for the margins to be that small. Also, will your word processor's image printing
software properly shrink or expand the image to the exact size to fit within the
margins you set?
As best I can measure, Microsoft Word thinks that an image that is 1242 pixels wide
is 12.95 inches wide, about 96 pixels per inch. It will not fit on a landscape page,
so Word will shrink the image until it does fit within the margins that you set.
So, if you set the margins for your landscape paper size to be the correct width for
6 Carcassonne tiles, the image will print the correct tile size.
Changing the Word Page Layout to print the proper size Tile
- Click on "Page Layout"
- Change the orientation to "Landscape"
- Click the "Margins" arrow
- Then click "Custom Margins" at the bottom of the list
- Change the Top and Bottom margins to 0.7 inch
- Change the Left and Right margins to 0.15 inch
 Before you waste a lot of ink printing your personal scoreboard with the wrong word processor settings for your personal word processor, right click and copy this image and test its size with some of your Carcassonne Tiles. Before you waste a lot of ink printing your personal scoreboard with the wrong word processor settings for your personal word processor, right click and copy this image and test its size with some of your Carcassonne Tiles.
To print the image, after setting up the blank Word page with the "Proper Margins", right click on the website screen image, then select "Copy Image". Then, right click on the empty Word page and select the first "Paste Options", "Keep Source Formatting (K)".
Word will proportionaly shrink the oversize website image to fit within the Left and Right margins that you entered. Print the page and see if 6 tiles by 4 tiles fit in the spaces! If your printer is having trouble with margins that small, you might have to play with the margins again, and maybe change to 8 1/2 by 14 Legal Paper with initial Left and Right margins of 1.65 inches.
|
